When we closed on our new house, Charlie was four and Emma was one. I knew from watching other Pulte families that the beautiful beige walls and gray floors weren’t going to stay perfect for long. Within the first month we had sticky handprints at toddler height, a rogue marker incident on the baseboards, and our 70lb Lab mix sliding across the new LVP like it was an ice rink.
I refused to live in a house that looked like a daycare center. So we got strategic. Here’s exactly what worked for us — real solutions from real life in a brand new construction home.
The Mindset Shift
Kid-proofing a new build isn’t about ugly plastic covers and foam everything. It’s about choosing durable materials, smart layouts, and systems that work with your family instead of fighting them. We wanted a home that felt nice for us and safe for the kids.
What We Did in the First Few Months
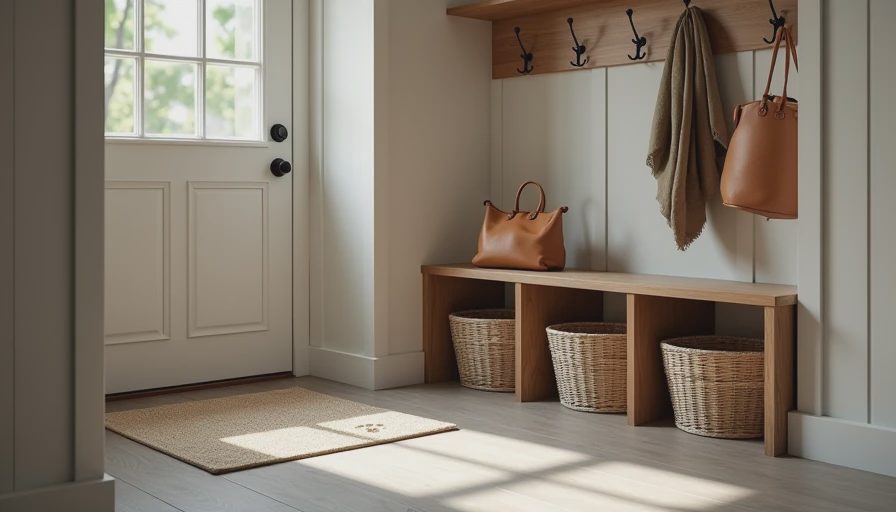
1. The Mudroom Command Center
This was priority number one. We turned the space right off the garage into a full kid/dog transition zone.
We installed:
A built-in bench with storage cubbies (DIY for $420)
Heavy-duty coat hooks at kid height
A large boot tray and shoe rack
Washable rug that could handle muddy paws
Total cost under $650. Now everyone stops at the door, kicks off shoes, and the rest of the house stays dramatically cleaner. No more red clay trails across the new floors.
2. Wall Protection That Doesn’t Look Cheap
Instead of ugly chair rails or foam, we used:
Matte paint with a slight eggshell sheen in high-traffic areas (easier to wipe)
Clear corner protectors on sharp drywall corners (almost invisible)
Removable wallpaper wainscoting in the play area — peel-and-stick that looks custom
The hallway that leads to the kids’ rooms now has a beautiful board-and-batten treatment we added for $180. It hides future dings and looks intentional.
3. Flooring Choices That Actually Survive
We upgraded the downstairs LVP to a thicker wear layer with good texture. Upstairs we went with stain-resistant carpet in the bedrooms. Two years in, it still looks solid despite endless snack crumbs, toy cars, and dog zoomies.
4. Furniture and Outlet Strategy
Corner guards on coffee tables (soft silicone that blends in)
Outlet covers with sliding mechanisms instead of cheap plugs
Furniture anchors on everything tall (new houses have kids, and we weren’t risking it)
Cable management sleeves that look clean
The Playroom vs Living Room Battle
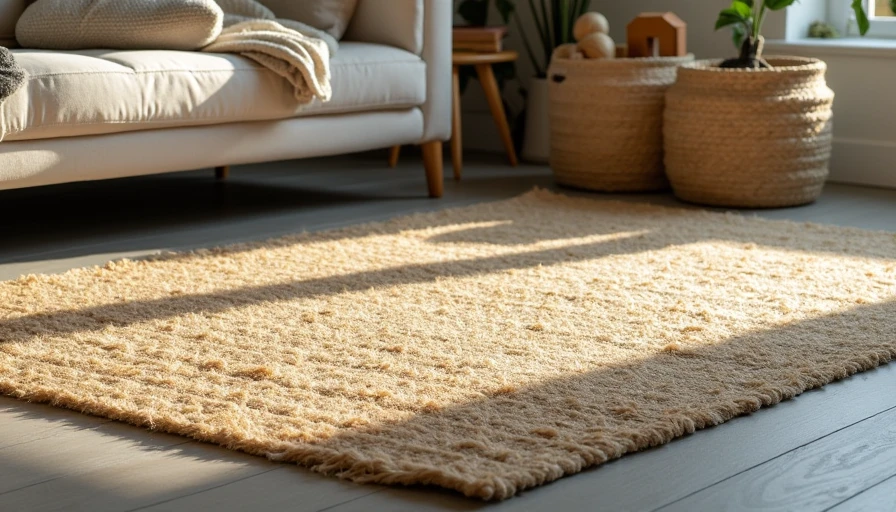
We tried keeping the living room adult-only. We lost. Spectacularly.
Instead, we embraced it. We added a large jute area rug over the LVP that hides spills and provides soft play space. Toy storage is in nice woven baskets that match the decor. When friends come over it still looks like a real house, not a toy explosion.
Pet-Proofing Overlap
Our Lab taught us a lot. We chose:
Scratch-resistant furniture fabrics
Washable throw blankets everywhere
A dog door insert for the back door (with a removable panel for winter)
Elevated food bowls on a mat that contains the mess
What We Skipped
Those ugly baby gates everywhere. We used pressure-mounted ones only where absolutely necessary and painted them to blend.
Cheap plastic outlet covers that fall out. Invested in better ones.
Wall-mounted TV that a kid could pull down. We used a low console instead.
Budget Breakdown
Mudroom setup: $650
Wall treatments & protectors: $480
Rugs and soft surfaces: $720
Safety anchors & covers: $190
Furniture adjustments: $350
Total Kid-Proofing Spend: ~$2,390
Spread over the first six months. Way cheaper than replacing ruined walls and floors later.
Daily Systems That Save Sanity
“Shoes off at the door” rule enforced with a fun sign the kids helped make
Weekly 10-minute family reset where everyone picks up one category
Designated snack zone in the kitchen with easy-clean surfaces
Laundry basket in each kid’s room to prevent clothes migration
Lessons From My Builder Days
I saw families install beautiful upgrades only to watch them get destroyed in six months. The ones who succeeded combined smart material choices with clear family systems. No amount of fancy finishes beats good habits.
The Unexpected Wins
Our kid-proofed house actually feels more comfortable for everyone. The durable choices mean we’re not constantly stressed about messes. We can actually enjoy the space instead of hovering.
Practical Kid-Proofing Checklist for New Builds
Create a solid entry transition zone
Protect high-traffic walls and corners early
Choose forgiving flooring and surfaces
Anchor all furniture
Build storage that works for little hands
Set clear family rules from day one
Plan for both kids and pets if you have them
The Bigger Truth
You don’t have to choose between a nice house and a kid-friendly house. With a little planning, you can have both.
A new house isn’t perfect. But it can be yours — even with small hands everywhere.
Two years later, our walls have some stories, our floors show real life, but the house still feels like a home we’re proud of. The kids are making memories instead of just making messes, and we’re not losing our minds in the process.
If you’re about to move into a new build with little ones, breathe. You don’t need perfection. You need smart, practical systems that let everyone actually live there.

No letters yet — pray write the first.