When the upgrade sheet hit the table, the kitchen backsplash line item practically jumped out and slapped me: $4,200 for “premium ceramic tile with professional installation.” Megan’s eyes lit up. I saw dollar signs and flashbacks to hundreds of similar consultations during my Pulte years.
I leaned over and whispered, “We’re not doing that.” She gave me the look. But five years watching buyers overpay for cosmetic stuff had taught me well. That backsplash upgrade is one of the most common regrets I saw — and one of the easiest to fix smarter after you close.
Here’s the full breakdown: why builder backsplash upgrades are usually a bad deal, what the real costs are, and exactly what we did instead that looks better and saved us thousands.
Why Builder Backsplash Upgrades Are Pricey (And Often Mediocre)
Builders offer a few “upgraded” tile options during selection. They look decent in the model home under perfect lighting. But the pricing? Brutal.
Materials that cost the builder $4–$8 per sq ft get marked up to $25–$40 installed.
Labor is bundled in at premium rates because it’s done during the frantic pre-closing phase.
Selection is limited to what they have contracts for — not necessarily the best design for your specific kitchen.
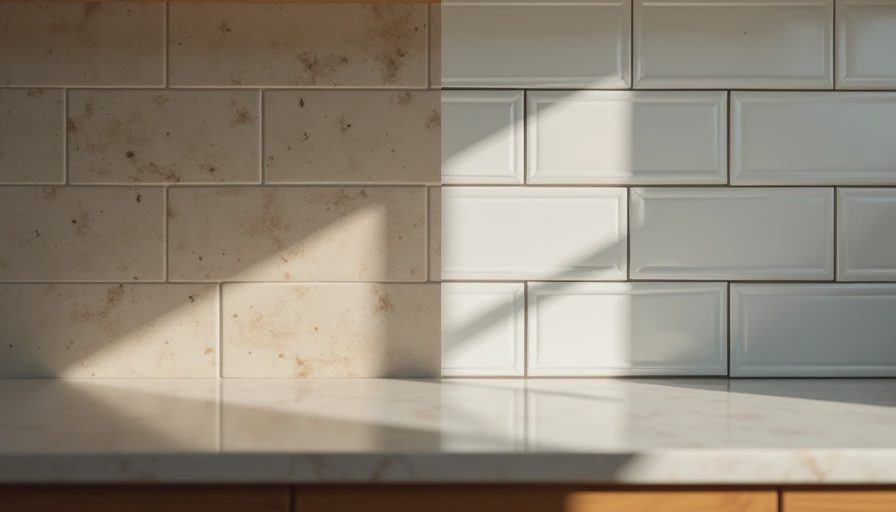
In our case, the $4,200 option covered about 45 sq ft of fairly basic subway tile with a standard grout color. I knew the builder’s actual cost was closer to $900–$1,100 total. Nice margin for them, not so nice for us.
The Hidden Downsides I Saw Repeatedly
During my time at Pulte, I watched families choose the upgrade, move in, and then immediately want something different. Trends change. Their taste evolved. Or they found a tile they loved more once the house wasn’t under construction chaos.
Plus, if you pick during the upgrade meeting, you’re locked into their schedule. Any delays in tile delivery can push your closing. I’ve seen it happen.
What We Did Instead (The Smarter Play)
We skipped the builder option entirely. Painted the walls a warm, light beige (#EDE4D5) that made the kitchen feel bigger, then handled the backsplash after we moved in.
Step-by-Step: Our Post-Closing Backsplash
Lived with it for 2 months — Gave us time to cook, spill things, and decide what we actually wanted in daily use.
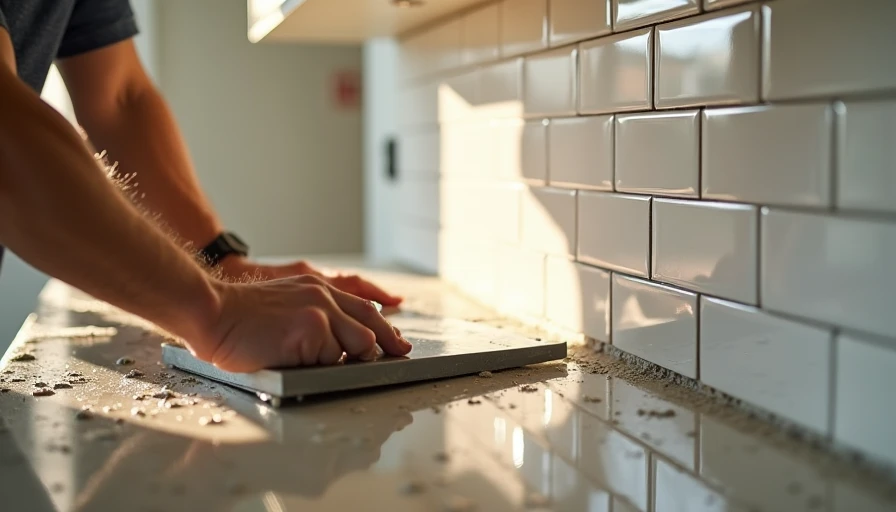
Chose better tile — We went with classic white subway tile but in a thicker, handmade-look version from a local supplier. Cost: $680 for materials.
Hired a solid local tile guy — $950 for installation (including removal of the builder’s basic backsplash if we had one — but we didn’t). Total: around $1,630.
Added a few custom touches — We mixed in some herringbone pattern behind the range and kept simple running bond elsewhere. Looks intentional and expensive.
Final result: A kitchen backsplash we actually love, for roughly 60% less than the builder quote.
Other Strong Alternatives to Builder Upgrades
Peel-and-stick tile — Great temporary or budget option. High-quality versions look shockingly good and can be done in a weekend for under $300.
Painted tile or refreshed grout — If the builder installed something basic, refresh it.
Full-height stone or quartz — If you want luxury, do it post-closing with a local fabricator who isn’t rushed.
No backsplash + open shelving — Popular right now and saves money while showing off dishes and decor.
Real Cost Comparison
Builder option: $4,200
Our way: $1,630
Savings: $2,570
That money went toward better countertops and the gravel path in the backyard instead.
Lessons From Watching Hundreds of Buyers
The families who regretted the backsplash upgrade the most were the ones who:
Chose it because “it’s easier to do now.”
Didn’t realize how limited the selections were.
Changed their mind about the whole kitchen vibe six months later.
The smart ones either negotiated the price down hard or waited. One couple I knew fought the price down to $2,800 and still wished they’d waited.
When the Builder Backsplash Might Actually Make Sense
To be fair, there are a couple scenarios:
Your closing timeline is extremely tight and you hate DIY.
You want a very complex pattern that requires precise coordination with cabinet and counter install.
You find an upgrade option that’s genuinely high-end and on deep discount.
Even then, get multiple bids from local installers first.
Pro Tips for Your Upgrade Meeting
Ask for the exact square footage and material specs in writing.
Request a lower price based on “value engineering.”
Take photos of the tile samples under different lighting.
Remember: you can always add a more beautiful backsplash later. You can’t easily undo a bad one.
The Kitchen Evolution in Our House
Six months after closing, our kitchen felt good but a bit builder-basic. After the backsplash install, it finally felt like us. We added some open shelving, swapped the hardware, and now it’s the heart of the house where we actually want to spend time.
The kids still leave fingerprints, but they’re on our backsplash now.
Your Backsplash Decision Framework
Is the builder option more than $60–$70 per sq ft installed? → Strong skip.
Do you have time and a reliable local contractor? → Wait and do it better.
Does the design feel timeless or trendy? → Big consideration.
Will this be the only kitchen upgrade you do? → Maybe lean yes.
Print this and take it to the meeting. It’ll pay for itself.
Final Thought
Builder upgrades push the “convenience” angle hard. But convenience is expensive, and you have more time than you think after closing.
A new house isn’t perfect. But it can be yours.
Don’t let a glossy brochure and pressure to “finish everything now” drain your budget on things you can do smarter and cheaper on your own timeline. Your future kitchen self will thank you.
Quick Action Checklist
Calculate real per sq ft cost of builder option
Research 3–4 local tile options and installers
Live in the space for at least 4–6 weeks before deciding
Compare total project quotes
Negotiate or skip with confidence
You’ve got this. Your kitchen doesn’t need to be perfect on day one. It just needs to be yours eventually.

No letters yet — pray write the first.